
Making a hand actuator

Build an actuator that could help a robotic hand move. An actuator is a device that causes something to happen (for example, a motor to make wheels turn or a robot move).

Text version of infographic entitled "The engineering design process"
The engineering design process
- Problem or challenge
- Define the problem
- Identify the constraints on your solution (e.g. time, money, materials) and criteria for success
- Brainstorm multiple solutions for the problem
- Select the most promising solution
- Prototype your solution
- Test and evaluate your prototype
- Iterate to improve your prototype
- Communicate your solution
Infographic entitled "The engineering design process". (Credit: Canadian Space Agency [CSA])
Define
Canada is providing Canadarm3 to Gateway. Canadarm3 is a smart robotic system that will include three parts:
- a large, 8.5-metre-long arm
- a smaller, more agile arm
- a set of detachable tools
It is designed to do a number of tasks, from repairing Gateway and capturing visiting vehicles to relocating modules and helping astronauts during spacewalks. This means that its extremities – or its hands – need to be quite versatile.
Like Canadarm2, each end of Canadarm3 will feature an identical "hand," known as a Latching End Effector. These pieces contain cables that tighten to ensure a strong grip. They will allow the robotic arm to firmly grasp objects or latch itself to Gateway. In other words, they are the actuators that help the "hands" grasp objects.
Identify
Do you think motors work the same way in space? Can you think of more efficient ways for robots to move? Think about all the constraints that could impact your design.
Suggested materials
- Paper, graph paper, or isometric paper to sketch your design
- Pencils, pencil crayons, crayons, or markers
- A choice of wood sticks, pencils, straws, or straight branches or twigs
- Cardboard, construction paper, or empty cereal box
- Beads (optional but you can also make your own paper beads)
- Fasteners (elastics, binder clips, brads, pipe cleaners, string, wool, tape, glue, or homemade glue)
- Scissors or cardboard cutters
- Hot glue gun (optional)
- Any repurposed materials you have on hand (plastic bottles, egg cartons, straws or rolled-up recycled paper to make a tube, Popsicle sticks, small twigs, rocks, etc.)
- Variety of paints, coloured paper, tinfoil, or any other materials available to make your hand actuator look awesome!
- Optional: Lego, K'NEX blocks, KEVA blocks

Text version of infographic showing a few cardboard cutting and folding techniques
A few cardboard cutting and folding techniques
- Flange
- L-brace
- Tabs
- Slot + cut
- Slot + tab
- String
A few cardboard cutting and folding techniques. (Credit: CSA)
Brainstorm
- How can we build a robotic end effector that can move similarly to our own hand?
- Your goal is to make your end effector for a robotic arm that can "grip" a tool or object.
- Plan your design keeping in mind the items you have available. Can you combine different materials to craft new items you can use to create your end effector?
Select
Once you have had a chance to brainstorm and share your ideas with others, choose an idea you liked the most and sketch your design before you try to make it. What materials do you have? How will you use them? What constraints will they add to your design?
Prototype
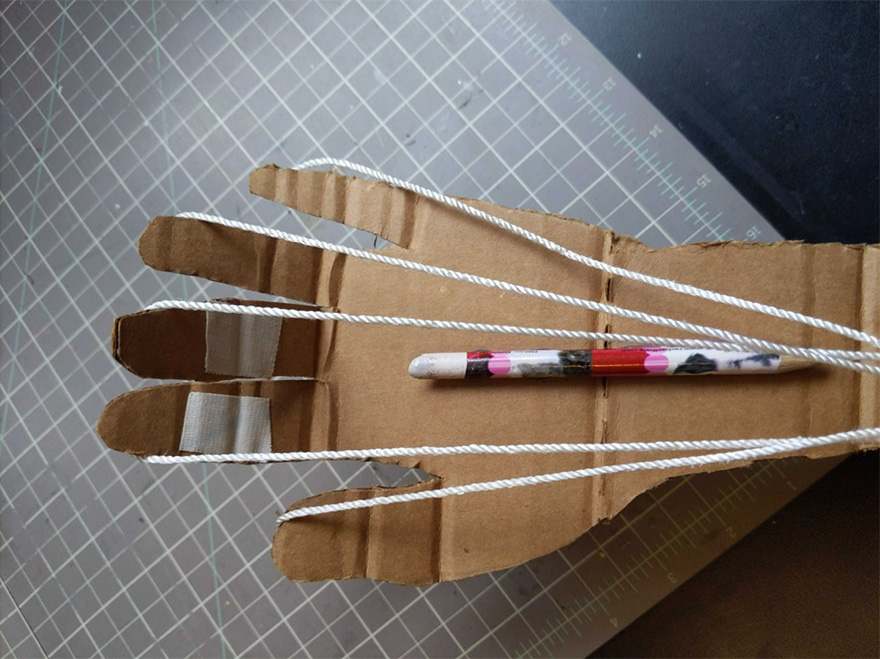
- Trace your hand onto a piece of cardboard (or empty cereal box) and cut out the hand.
- Fold the fingers on your cardboard hand in the same spots as the joints are in your fingers (you can choose to use two or three finger joints).
- Make tubes out of paper, or find a tubular object like a straw, and cut the pieces of straw that will fit onto the three different segments of your cardboard fingers. You can tape or glue them onto the cardboard.
- Run a piece of string through the straws on each finger. Make a knot at the end of each rope or tape it to the hand: that way it will not fall out. If you have beads, they are a great option also.
- When you pull on the ends of the strings, each of the fingers should now be able to bend and flex similar to a human hand.
- Place various objects in the palm of the hand and test to see if the hand is able to hold, or grip, the object.
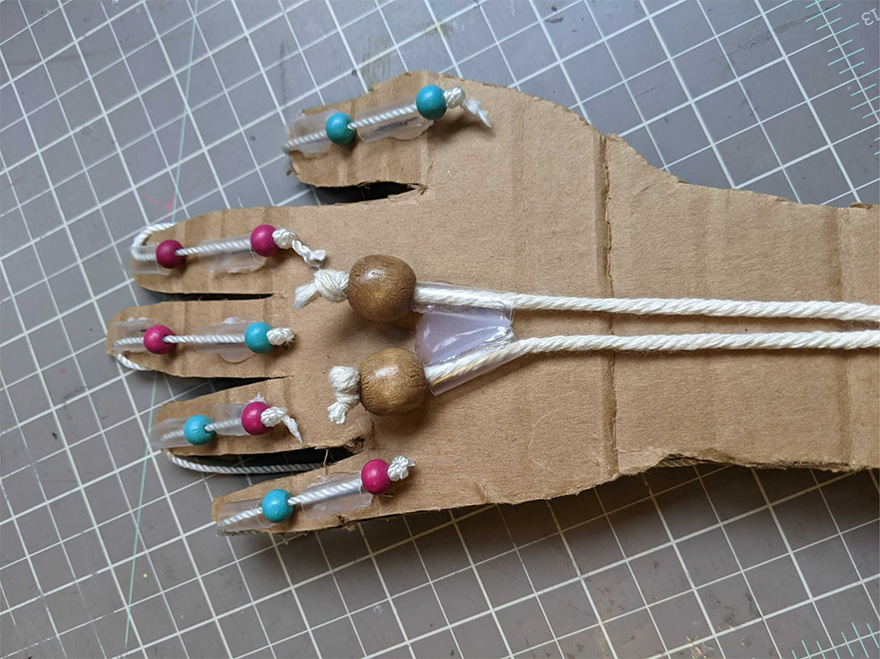
Top and bottom view of an example of hand actuator activated by a series of strings. (Credit: CSA)
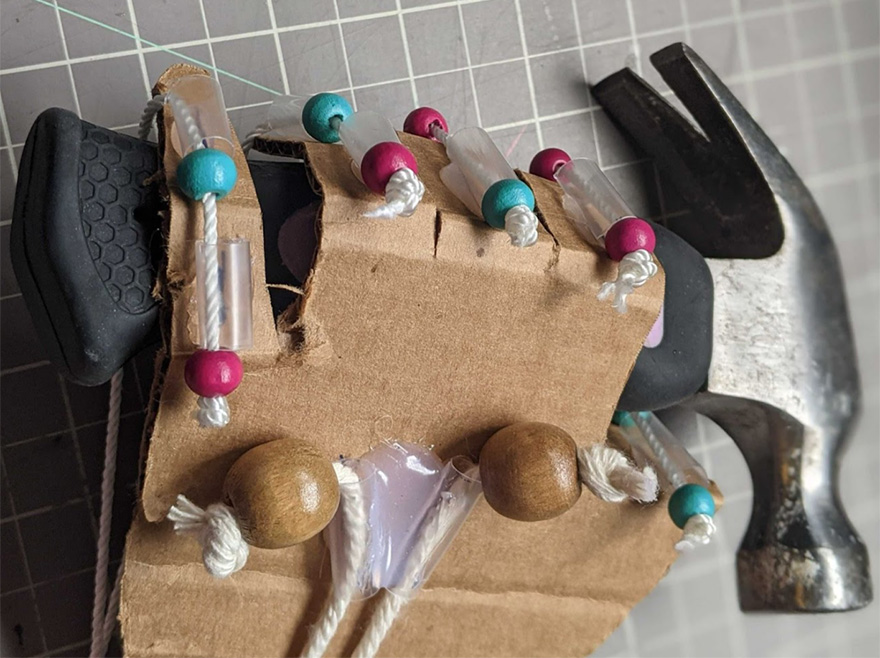
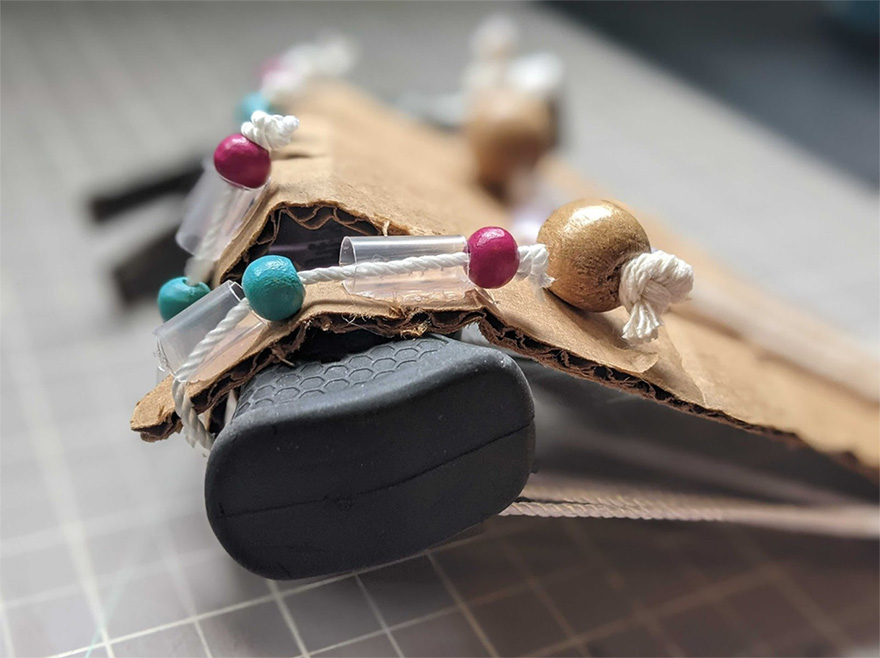
When pulled, the strings activate the fingers of the hand to grab a hammer as seen in these full and close-up views. (Credit: CSA)
Test
Begin experimenting with the number of fingers, joints, length of fingers to design more functional, stronger, better designs. Does it work? Are you able to hold or grip different types of objects?
Iterate
- Did it work? If not, what part stops you from being able to do hold, grab, or grip an object?
- In order to have access to your object from every angle, how would you modify your build?
- How could you make it better and more effective?
- How could you build it with fewer materials?
- Are there things you'd do differently, or add, if you had more time or different materials?
Communicate
- What are the highlights of your robotic end effector? Is there something about it you are really excited about?
- Share your project with us or ask an adult to share a picture on social media and tag the CSA. You never know: a real astronaut might see your creation.
Taking it further
- Can you add or remove parts to your end effector to increase its effectiveness?
- Try using paper circuits to add lights to your end effector.
- Use servo motors and a microcontroller to actuate your end effector.
- Design components in your favourite 3D modelling software and 3D print custom parts.
- Use servos, sensors, and a microcontroller to automate your end effector.
- Integrate Scratch coding or a Makey Makey to make your end effector interactive.
- Integrate mechanisms to control your end effector.
Curriculum links
- Design thinking and the engineering design process
- Critical thinking, problem solving, communication, and collaboration
- Science:
- Simple mechanisms
- Space
- Health:
- Dexterity, muscles and body movements
- Math:
- Measurement
- Technology:
- Robotics